One of the features many websites use to personalize their content is to give users their own domain name, for example bunwich.blogspot.com or bunwich.mysite.com. This technique is called wildcard subdomains. In this tutorial, I'll be explaning how you can configure a nameserver to resolve all these addresses to the same server. You'll need to use mod_rewrite and .htaccess to parse the data, and the scripting language of your choice to refine the arguments even more. (I'll write these later ones when I have some time.
Tested on:
Linux LAMP Server (I'm using Fedora 10) as a guest OS on VMware
VMWare Server 2.0 is on Windows XP
Using yum or any GUI add/remove software program, install these rpm's:
- bind-chroot
- rpm dependancies should automatically add the bind rpm's
- system-config-bind - a not so intuitive gnome tool to setup your DNS server. I'll paste the output files that it produces in case you want to do it all by hand.
/etc/named.conf - contains the zone, ie the domain we'll be working with
/etc/resolve.conf - the address of the nameserver we'll be using
/var/named/chroot/var/named/ - directory of where the system-config-bind writes all the zone files to.
mysite.com is the domain I'm going to use to refer to my server.
Step 1
Make sure your firewall has port 53 open and you can connect to the internet. Start and stop your DNS server by running the command
service named restart. You should receive OK messages.
Step 2
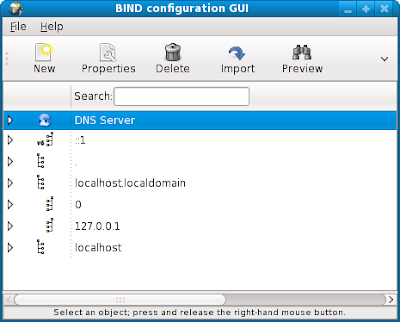
run system-config-bind - here's a picture of the GUI
Step 3
What we want to do next is to get our domain name server to resolve to an IP of our choice. I'm going with my lan IP as I'm using this for testing.
mysite.com -> 192.168.100.10 . (No disrespect to the real mysite.com as we'll be redirect users to your own server - people must be using your dns server for that to happen)
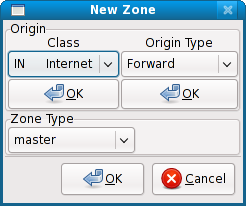
Highlight DNS Server and click on New -> Zone
A new window will pop up.
Click on the two OK's at the top. Your options should be
Class In Internet and
Origin Type Forward
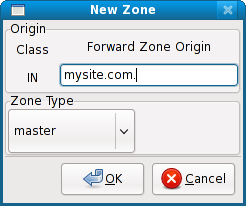
You will get this window.
Enter your domain. In our case:
mysite.com.
Make sure mysite.com. has a period after the com.
Click on OK.
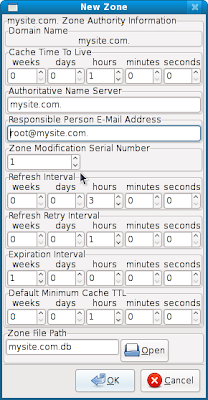
Take note that the period is added to the end of mysite.com.
Click on OK
The last field has mysite.com.db this will contain your zone and ip information for your server which may be found in /var/named/chroot/var/named/mysite.com.db
On the main GUI click and the Save Button. The .db file will be written.
Step 4
Associate our name server to an IP.
On the main GUI, make sure mysite.com is highlighted. Click on New and choose:
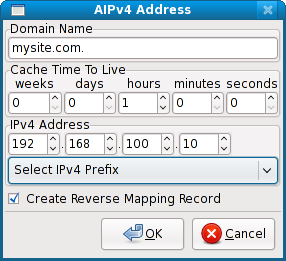
A IPv4 address. The pop up on the right will appear. Enter your ip address. Note that the domain name mysite.com. has a period on the end too. We select Create Reverse Mapping record for our ip and a zone will be created for it on our name server.
On the main GUI click on the Save button.
Step 5
We now have our name server setup and we should be able to ping and nslookup mysite.com
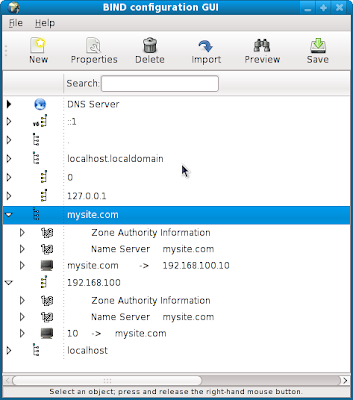
Here is how the main GUI now looks
Step 6
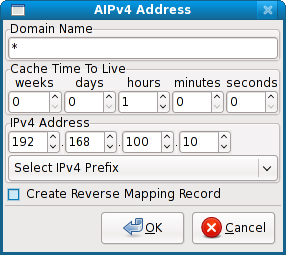 Finally the wildcard setup. Right click on mysite.com, add a new A IPv4 Address. Fill in the info with a wildcard and deselect Create Reverse Mapping Record. Refer to the image on the right.
Save and run
service named restart
Step 7
Make sure you edit /etc/resolve.conf to use your name server
I have
search localhostNote: if you're using network manager or system-config-network, add 127.0.0.1 as your name server.
nameserver 127.0.0.1
Done!
You should now be able to ping and nslookup mysite.com or ftp.mysite.com and be directed to 192.168.100.10. As long as those computers use this nameserver.
Next time I'll go mod_rewrite and htaccess that will help you setup wildcard subdomains
As promised before here are the configs in the conf and zone files.
/etc/named.conf
//
// named.conf
//
// Provided by Red Hat bind package to configure the ISC BIND named(8) DNS
// server as a caching only nameserver (as a localhost DNS resolver only).
//
// See /usr/share/doc/bind*/sample/ for example named configuration files.
//
options {
listen-on port 53 { 127.0.0.1; };
listen-on-v6 port 53 { ::1; };
directory "/var/named";
dump-file "/var/named/data/cache_dump.db";
statistics-file "/var/named/data/named_stats.txt";
memstatistics-file "/var/named/data/named_mem_stats.txt";
allow-query { localhost; };
recursion yes;
};
logging {
channel default_debug {
file "data/named.run";
severity dynamic;
};
};
zone "100.168.192.IN-ADDR.ARPA." IN {
type master;
file "192.168.100.db";
};
zone "mysite.com." IN {
type master;
file "mysite.com.db";
};
zone "." IN {
type hint;
file "named.ca";
};
include "/etc/named.rfc1912.zones";
/var/named/chroot/var/named/mysite.com.db
$TTL 1H
@ SOA @ root ( 4
3H
1H
1W
1H )
NS @
IN 1H A 192.168.100.10
* IN 1H A 192.168.100.10
/var/named/chroot/var/named/192.168.100.db
$TTL 1HThat's all.
@ SOA mysite.com. root.mysite.com. (3
3H
1H
1W
1H )
NS mysite.com.
10 PTR mysite.com.